Category: Issues and problems
Some times for development reasons required to import virtual box format machine to VMWare datacenter, based on corporate network and running on the hosts managed by VMWare vShpere 6.5
This can be case of baking VM on developer or DevOps machine and once machine is ready it is migrating to development, testing or production environment. It is can be testing case machine or automation helper machine, doesn’t really mater at this point. Main task of this article to resolve the commonly appearing issue with mismatching formats even documentation to used software is saying that this conversion is compatible and “should work”.
I have hit this issue during deploying OVF template, built in VertualBox and needed to be transferred to VMware based datacenter:

Issue clearly laying in incompatibility exported VM from virtual box even VMWare accepts *.ova format.
In further investigation of this issue i have tried to reexport current box and saw different in XML metafile for this virtual machine setup. Difference is that tags for storage and network description tags:
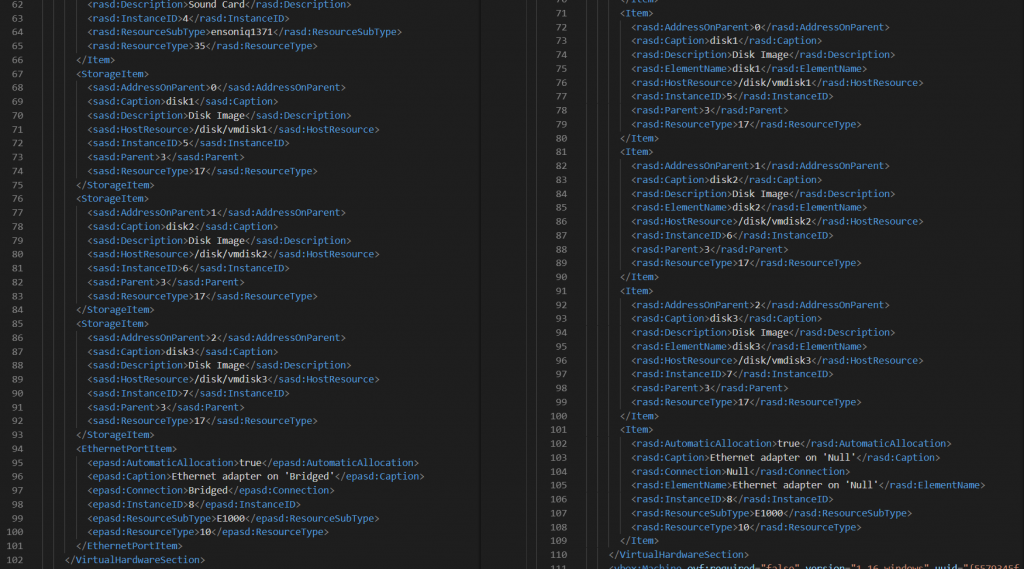
As visible from ovf files comparison tags for harddisk and network description is changed. In oder versions this is still when in new versions it has own tags for each type of device.
As future tsts showed this is not an issue for VMWare OVF deployment process. Error sugested it is hardware issue but not VM recquired issue.
Going deeper in OVF files analyzing I have spotted that section:

To make this deployable system type should be changed to supported, as stated in error message: vmx-04, vmx-07, vmx-08, vmx-09, vmx-10, vmx-11, vmx-12, vmx-13
In my case I have selected vmx-11 and placed it instead virtualbox-2.2 so modified file looked like that:
<VirtualHardwareSection>
  <Info>Virtual hardware requirements for a virtual machine</Info>
  <System>
    <vssd:ElementName>Virtual Hardware Family</vssd:ElementName>
    <vssd:InstanceID>0</vssd:InstanceID>
    <vssd:VirtualSystemIdentifier>sagaqa205_1</vssd:VirtualSystemIdentifier>
    <vssd:VirtualSystemType>vmx-11</vssd:VirtualSystemType>
  </System>
Additional issue was that VMWare was always complaining on hash so after removing hash file from the list of uploaded files all worked fine. This step not recomended but as I generated VM myself it is ok for me to exclude hash from check process.
Once all modification done go to vSphere portal and click on “Deploy OVF Template”, follow proposed steps and complete virtual machine import. This time should not be any issue with import. Only a little reminder to select all files including ovf an vmdk files which is complete VirtualBox VM export.
In DevOps Azure during switching Azure AD for organisation in Azure DevOps (VSTS) or in situation, when git repository keep the same name but users get new identity, error “fatal: Authentication failed for…” may appear.

Few steps needed to be done in Azure DevOps (VSTS) git repository prior applying changes in your local machine. Please go to Azure DevOps -> Repos, select any repository you need to clone and click “Clone” button. After cloning popup appear on the screen click on “Generate Git Credentials”:
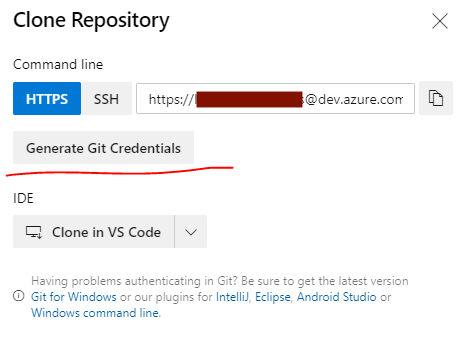
In next screen click “Copy” icon to save your token in memory (or highlight whole token and use Ctrl+c). That’s all we need from Azure DevOps at this point and it is time to do some changes at your computer.
Click on search bar near Windows “start” button on the screen and search for “Credential manager” – searching windows components like this I found quick and productive. Alternatively you may go to Control Panel -> User Accounts -> Credential Manager.

Locate git reference in list of all credentials, click on expand icon (on the right) and on expanded section button “Edit” should be present, click on it:

On next screen popup with title “Edit Generic credential” will appear. This is the place where we will be using copied to memory personal token from Azure DevOps repos. It may sound confusing and not related but repos token need to be copied to Password text field so highlight all text in that field and use magic of Ctrl+V.
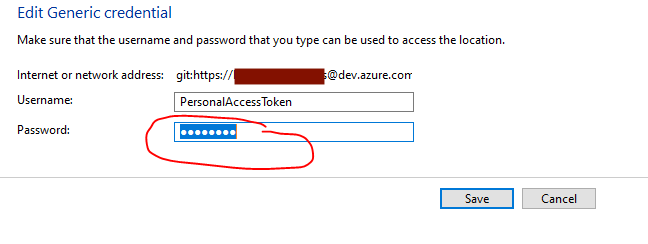
Click “Save” and here you go… Git repository authentication is fixed.